

Table of contents
- Check This Project for more Understanding
- What is Axios?
- Why Use Axios in React?
- How to Set Up Axios with React
- How to Make a GET Request (Retrieve Data)
- How to Make a POST Request (Create Data)
- How to Make a PUT Request (Update Data)
- How to Make a DELETE Request (Delete Data)
- How to Handle Errors with Axios
- How to Use useState with Axios
- How to Display Data with map
- Putting It All Together
- Conclusion
Table of Contents (TOC)
Check This Project for more Understanding
You will learn how to use Axios with React to make different types of HTTP requests. Axios is a popular library that allows you to perform various operations on data from an API endpoint. You will also learn some basic concepts of React, such as useEffect, useState, and map.
What is Axios?
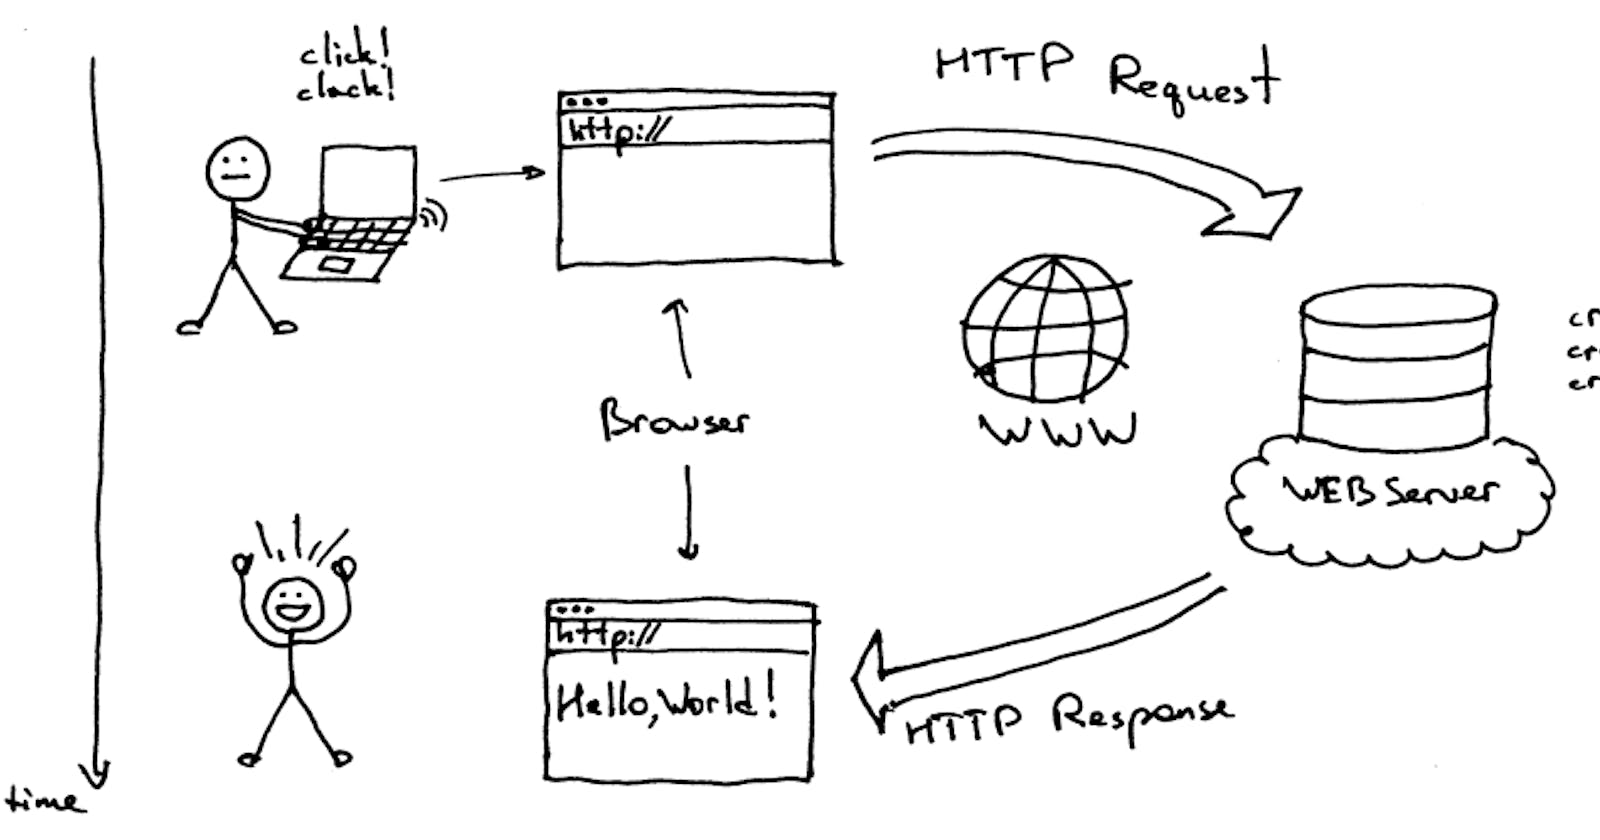
Axios is an HTTP client library that allows you to make requests to a given endpoint. This could be an external API or your own backend server, for example. By making a request, you expect your API to perform an operation according to the request you made. For example, if you make a GET request, you expect to get back data to display in your application.
Why Use Axios in React?
There are many reasons why you should use Axios as your client to make HTTP requests, but here are some of the main ones:
It has good defaults to work with JSON data. Unlike alternatives such as the Fetch API, you often don't need to set your headers or perform tedious tasks like converting your request body to a JSON string.
It has function names that match any HTTP methods. To perform a GET request, you use the
.get()method.It does more with less code. Unlike the Fetch API, you only need one
.then()callback to access your requested JSON data.It has better error handling. Axios throws 400 and 500 range errors for you. Unlike the Fetch API, where you have to check the status code and throw the error yourself.
It can be used on the server as well as the client. If you are writing a Node.js application, be aware that Axios can also be used in an environment separate from the browser.
How to Set Up Axios with React
Using Axios with React is a very simple process. You need three things:
An existing React project
To install Axios with npm/yarn
An API endpoint for making requests
The quickest way to create a new React project is by using Create React App. If you have an existing React project, you just need to install Axios with npm (or any other package manager):
npm install axios
In this article, you will use the JSON Placeholder API to get and change post data. Here is a list of all the different routes you can make requests to, along with the appropriate HTTP method for each:
| Route | Method | Description |
| /posts | GET | Get all posts |
| /posts/1 | GET | Get post with id 1 |
| /posts | POST | Create a new post |
| /posts/1 | PUT | Update post with id 1 |
| /posts/1 | DELETE | Delete post with id 1 |
How to Make a GET Request (Retrieve Data)
To make a GET request with Axios, you need to use the .get() method and pass in the URL of the endpoint you want to fetch data from. For example, if you want to get all posts from the JSON Placeholder API, you would write something like this:
import axios from "axios";

axios.get("https://jsonplaceholder.typicode.com/posts")
  .then(response => {
    // handle success
    console.log(response.data);
  })
  .catch(error => {
    // handle error
    console.error(error);
  });
The .get() method returns a promise, which means that you can use .then() and .catch() callbacks to handle the response or the error. The response object contains various properties, such as status, headers, and data. The data property is what we are interested in, as it contains the JSON array of posts.
How to Make a POST Request (Create Data)
To make a POST request with Axios, you need to use the .post() method and pass in two arguments: the URL of the endpoint you want to send data to, and an object containing the data you want to create. For example, if you want to create a new post with some dummy data, you would write something like this:
import axios from "axios";

const newPost = {
  title: "Hello World",
  body: "This is a new post",
  userId: 1
};

axios.post("https://jsonplaceholder.typicode.com/posts", newPost)
  .then(response => {
    // handle success
    console.log(response.data);
  })
  .catch(error => {
    // handle error
    console.error(error);
  });
The .post() method also returns a promise, which means that you can use .then() and .catch() callbacks to handle the response or the error. The response object contains the same properties as the GET request, but the data property now contains the newly created post, along with an id generated by the API.
How to Make a PUT Request (Update Data)
To make a PUT request with Axios, you need to use the .put() method and pass in two arguments: the URL of the endpoint you want to update data on, and an object containing the data you want to update. For example, if you want to update the title and body of the post with id 1, you would write something like this:
import axios from "axios";

const updatedPost = {
  title: "Hello World Updated",
  body: "This is an updated post",
  userId: 1
};

axios.put("https://jsonplaceholder.typicode.com/posts/1", updatedPost)
  .then(response => {
    // handle success
    console.log(response.data);
  })
  .catch(error => {
    // handle error
    console.error(error);
  });
The .put() method also returns a promise, which means that you can use .then() and .catch() callbacks to handle the response or the error. The response object contains the same properties as the GET and POST requests, but the data property now contains the updated post.
How to Make a DELETE Request (Delete Data)
To make a DELETE request with Axios, you need to use the .delete() method and pass in one argument: the URL of the endpoint you want to delete data from. For example, if you want to delete the post with id 1, you would write something like this:
import axios from "axios";

axios.delete("https://jsonplaceholder.typicode.com/posts/1")
  .then(response => {
    // handle success
    console.log(response.data);
  })
  .catch(error => {
    // handle error
    console.error(error);
  });
The .delete() method also returns a promise, which means that you can use .then() and .catch() callbacks to handle the response or the error. The response object contains the same properties as the GET, POST, and PUT requests, but the data property is now an empty object.
How to Handle Errors with Axios
As you have seen, Axios throws errors for you when the status code of the response is in the 400 or 500 range. This means that you can use the .catch() callback to handle any errors that may occur during your requests. For example, if you try to make a GET request to an invalid endpoint, you would get an error like this:
import axios from "axios";

axios.get("https://jsonplaceholder.typicode.com/invalid")
  .then(response => {
    // handle success
    console.log(response.data);
  })
  .catch(error => {
    // handle error
    console.error(error);
  });
The error object contains various properties, such as message, name, stack, and config. The message property is what we are interested in, as it contains a brief description of what went wrong. For example, in this case, the message would be:
Error: Request failed with status code 404
You can use this message to display a user-friendly error message in your application or perform some other action based on the error.
How to Use useState with Axios
To display the data that you fetch from the API, you need to use another React hook called useState. useState is a hook that lets you add a state variable to your component. A state variable is a piece of data that can change over time and affect your UI.
To use useState, you need to pass in an initial value and get back an array with two elements: the current state value and a function to update it. For example, if you want to have a state variable called posts that holds an array of posts, you would write something like this:
import React, { useState } from "react";

function App() {
  const [posts, setPosts] = useState([]);
  // ...
}
The convention is to name the state variable and the update function like [something, setSomething] using array destructuring. The initial value can be any type, but in this case, we use an empty array because we expect our data to be an array of posts.
To update the state value, you need to call the update function and pass in the new value. For example, if you want to set the posts state to the data that you get from the API, you would write something like this:
import React, { useState } from "react";
import axios from "axios";

function App() {
  const [posts, setPosts] = useState([]);

  useEffect(() => {
    axios.get("https://jsonplaceholder.typicode.com/posts")
      .then(response => {
        // handle success
        console.log(response.data);
        // update state
        setPosts(response.data);
      })
      .catch(error => {
        // handle error
        console.error(error);
      });
  }, []);

  // ...
}
Notice that we call setPosts inside the .then() callback of the Axios request. This way, we ensure that we only update the state when we have a successful response. Also notice that we pass in response.data as the new value, which is the array of posts that we want.
How to Display Data with map
Now that we have our data in our state variable, we need to display it in our UI. To do this, we need to use a JavaScript method called map. map is a method that takes an array and returns a new array with each element transformed by a function.
To use map, you need to pass in a callback function that takes an element of the original array and returns a new element for the new array. For example, if you want to map an array of numbers to an array of strings, you would write something like this:
const numbers = [1, 2, 3];
const strings = numbers.map(number => number.toString());
console.log(strings); // ["1", "2", "3"]
In React, we can use map to transform an array of data into an array of JSX elements. JSX elements are what React uses to render HTML elements in the browser. For example, if you want to map an array of posts to an array of paragraphs, you would write something like this:
import React from "react";

function App() {
  const posts = [
    { id: 1, title: "Hello World", body: "This is a post" },
    { id: 2, title: "Hello React", body: "This is another post" },
    { id: 3, title: "Hello Axios", body: "This is yet another post" }
  ];

  return (
    <div>
      {posts.map(post => (
        <p key={post.id}>{post.title}: {post.body}</p>
      ))}
    </div>
  );
}
Notice that we use curly braces {} to embed JavaScript expressions inside JSX. Also notice that we use parentheses () to wrap our JSX elements inside the callback function. This is because JSX is not valid JavaScript syntax, so we need parentheses to tell JavaScript that it's an expression.
Also notice that we use a key prop on each paragraph element. This is because React needs a way to identify each element in a list and keep track of changes. The key prop should be a unique and stable identifier for each element. In this case, we use the id property of each post object.
Putting It All Together
Now that you know how to use Axios, useEffect, useState, and map with React, let's put it all together and create a simple app that displays posts from the JSON Placeholder API. Here is the complete code:
import React, { useEffect, useState } from "react";
import axios from "axios";

function App() {
  const [posts, setPosts] = useState([]);

  useEffect(() => {
    axios.get("https://jsonplaceholder.typicode.com/posts")
      .then(response => {
        // handle success
        console.log(response.data);
        // update state
        setPosts(response.data);
      })
      .catch(error => {
        // handle error
        console.error(error);
      });
  }, []);

  return (
    <div>
      <h1>Posts</h1>
      {posts.map(post => (
        <p key={post.id}>{post.title}: {post.body}</p>
      ))}
    </div>
  );
}

export default App;
Conclusion
In this article, you have learned how to use Axios with React to make different types of HTTP requests. You have also learned some basic concepts of React, such as useEffect, useState, and map. You have created a simple app that displays posts from the JSON Placeholder API.
Here are some key points to remember:
Axios is an HTTP client library that allows you to make requests to a given endpoint and perform various operations on data.
Axios has good defaults to work with JSON data, function names that match HTTP methods, less code, better error handling, and cross-environment compatibility.
To use Axios with React, you need to install it with npm/yarn and import it in your component.
To make a GET request with Axios, you need to use the
.get()method and pass in the URL of the endpoint you want to fetch data from.To make a POST request with Axios, you need to use the
.post()method and pass in the URL of the endpoint you want to send data to and an object containing the data you want to create.To make a PUT request with Axios, you need to use the
.put()method and pass in the URL of the endpoint you want to update data on and an object containing the data you want to update.To make a DELETE request with Axios, you need to use the
.delete()method and pass in the URL of the endpoint you want to delete data from.To handle errors with Axios, you need to use the
.catch()callback and access theerror.messageproperty.useEffect is a hook that allows you to perform side effects in your component, such as fetching data from an API. You need to pass in a callback function that contains your side effect logic and an optional array of dependencies that tells React when to run your side effect.
useState is a hook that allows you to add a state variable to your component. You need to pass in an initial value and get back an array with the current state value and a function to update it. You can use any type as the initial value or the next value.
map is a method that takes an array and returns a new array with each element transformed by a function. You can use it to transform an array of data into an array of JSX elements. You need to pass in a callback function that takes an element of the original array and returns a JSX element for the new array. You also need to use a
keyprop on each JSX element.
I hope you enjoyed this article and learned something new. If you have any questions or feedback, feel free to leave a comment below. Happy coding! 😊